Continuing the series on finishing the basement . . . today's focus is drywall. This was done from 11-20 May (hanging) and 22 May – 9 June (mudding/sanding, the first time). Obviously, this was done intermittently over that period.
- Hang drywall.
- If you framed appropriately, drywalling will go much easier for you.
- Drywall comes in 4-ft sections, and the goal is to install entire sheets if possible. The key is the edges: align both sides of a drywall section with the mid-point of studs (or joists). If you do not, the drywall will 'hang' in mid-air not be stable.
- Whether on ceiling or wall, drywall screws should be used and placed at frequent intervals along all joists or studs behind a piece.
- Screws should be driven in enough to sink just below the drywall surface, but not so far that they puncture the drywall paper. When that happens, the screw is not supporting the drywall at all.
- When cutting drywall, use a utility knife and a straight edge. Run the knife along the edge (or line you drew), cutting through one side of the drywall paper but not the other. Once a line is cut, lift the drywall upright and 'snap' it along the cut line.
- Install ceiling drywall first.
- You can use a drywall lift or a 'dead-man', which is a T-shaped wood frame that holds the piece in place while people screw it in. We built two of the latter; when installing a ceiling section, two of us held the piece above our heads while two others used the dead-mans to hold it against the ceiling.
- Position ceiling pieces with their edges on the mid-point of joists so you can secure them appropriately.
- Be aware of any wiring or pipes in the area. They must be above the joists to make drywalling possible, but sometimes wire can hang down and get pinched or punctured by screws.
- You probably installed lights (or prepared places for them) in the electrical step. Mark where they are on the walls so that when the ceiling is up, you will know exactly where to cut openings for the lights.
- Install wall drywall next.
- Since drywall comes in 8-ft heights, you will need to trim it based on the distance between your ceiling drywall and the floor. Do not assume the distance is equal across the 4-ft section of drywall; measure at multiple places to make sure you account for variations.
- Drywall needs a small gap (1/2 inch) at the bottom so that any water/moisture will not affect it and create mold. Take that into account when measuring.
- Account for switches and outlets; you will need to cut out portions of the drywall for those.
- Mud/sand drywall.
- After drywall is in place, it needs to be mudded to smooth out the walls, hide the drywall screws, and cover the seams between pieces.
- Install corner bead (metal brackets) on all edges by cutting the bead to length and at angles where necessary.
- We left this to an expert. Everyone says it is worth it to not try to do this yourself; experts can do this much faster and better.
- After mudding comes sanding. Again, leave it to an expert. And this generates an incredible amount dust, so seal off the area (and any intakes to your HVAC system) appropriately.
- This portion can be expensive (thousand(s) of dollars). Be warned.
- In our case, this took the longest time due to contractor availability.
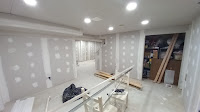
The pictures below trace the journey from hanging drywall through mudding/sanding (as of 9 June). After that, we primed the walls to identify spots for touch-up, then had the contractor come back (at his urging) to do so. We also encountered a problem . . . more on that in the next post.


No comments:
Post a Comment