Friday, August 25, 2023

Finishing a Basement, Part 6

Continuing the series on finishing the basement . . . today's focus is [still] drywall.

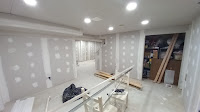
As I mentioned in the last post, our contractor finished the initial sanding on 9 June. He told us to prime the walls and (after the paint dried) circle spots for him to return and touch up (by applying more mud and sanding/etc.). We primed the walls, then noticed something . . . our bulkhead wasn't straight.
This was a purely aesthetic matter; it was fine structurally. And I was (at first) reluctant to do anything about it. But my wife (a perfectionist) insisted we should fix it before moving on, so we did.

A friend came over to help us through this. We took down the bulkhead underside, cut two wedges (after very careful measuring, planning, leveling/etc.), cut a wood piece for the end, and re-attached new drywall (on the underside and slivers on the sides). We installed new corner bead. This all happened on 24 June and took ~3 hours. 


We then had our contractor return to re-mud/sand that portion on 28 June:

There were more areas to touch up, but he unfortunately got in an accident, so someone else came out 10-12 July (it took us a while to find someone) to finish the touch-up areas:

We then re-primed (16-20 July, as we had the time):
It was ready for painting. But we dropped over a month due to contractor availability and schedule conflicts. It was easy physically but hard psychologically, as we looked at the calendar and realized school was a month away. Could we get done in time?

Thursday, August 24, 2023

Finishing a Basement, Part 5

Continuing the series on finishing the basement . . . today's focus is drywall. This was done from 11-20 May (hanging) and 22 May – 9 June (mudding/sanding, the first time). Obviously, this was done intermittently over that period.
  • Hang drywall.
    • If you framed appropriately, drywalling will go much easier for you. 
      • Drywall comes in 4-ft sections, and the goal is to install entire sheets if possible. The key is the edges: align both sides of a drywall section with the mid-point of studs (or joists). If you do not, the drywall will 'hang' in mid-air not be stable. 
    • Whether on ceiling or wall, drywall screws should be used and placed at frequent intervals along all joists or studs behind a piece. 
      • Screws should be driven in enough to sink just below the drywall surface, but not so far that they puncture the drywall paper. When that happens, the screw is not supporting the drywall at all.
    • When cutting drywall, use a utility knife and a straight edge. Run the knife along the edge (or line you drew), cutting through one side of the drywall paper but not the other. Once a line is cut, lift the drywall upright and 'snap' it along the cut line.
    • Install ceiling drywall first. 
      • You can use a drywall lift or a 'dead-man', which is a T-shaped wood frame that holds the piece in place while people screw it in. We built two of the latter; when installing a ceiling section, two of us held the piece above our heads while two others used the dead-mans to hold it against the ceiling. 
      • Position ceiling pieces with their edges on the mid-point of joists so you can secure them appropriately.
      • Be aware of any wiring or pipes in the area. They must be above the joists to make drywalling possible, but sometimes wire can hang down and get pinched or punctured by screws.
      • You probably installed lights (or prepared places for them) in the electrical step. Mark where they are on the walls so that when the ceiling is up, you will know exactly where to cut openings for the lights.
    • Install wall drywall next.
      • Since drywall comes in 8-ft heights, you will need to trim it based on the distance between your ceiling drywall and the floor. Do not assume the distance is equal across the 4-ft section of drywall; measure at multiple places to make sure you account for variations.
      • Drywall needs a small gap (1/2 inch) at the bottom so that any water/moisture will not affect it and create mold. Take that into account when measuring.
      • Account for switches and outlets; you will need to cut out portions of the drywall for those.
  • Mud/sand drywall.
      • After drywall is in place, it needs to be mudded to smooth out the walls, hide the drywall screws, and cover the seams between pieces.
      • Install corner bead (metal brackets) on all edges by cutting the bead to length and at angles where necessary.
      • We left this to an expert. Everyone says it is worth it to not try to do this yourself; experts can do this much faster and better. 
      • After mudding comes sanding. Again, leave it to an expert. And this generates an incredible amount dust, so seal off the area (and any intakes to your HVAC system) appropriately.
      • This portion can be expensive (thousand(s) of dollars). Be warned.
      • In our case, this took the longest time due to contractor availability.
The pictures below trace the journey from hanging drywall through mudding/sanding (as of 9 June). After that, we primed the walls to identify spots for touch-up, then had the contractor come back (at his urging) to do so. We also encountered a problem . . . more on that in the next post.


Tuesday, August 22, 2023

Finishing a Basement, Part 4

Continuing the series on finishing the basement . . . 
This is where the 'real work' began: framing the walls, doing the electrical, and rolling insulation. I placed the pictures after all of today's steps. We did the below 8-12 May.
  • Frame the walls.
    • Building the wood frames was a lot of fun . . . and a lot of work. This guide is handy and largely aligns with our approach.
    • The frame consists of a bottom plate, the studs (spaced every 16"), and the top plate. All wood are 2x4s (though actual dimensions are 1.5"x3.5")
    • The bottom plate (any wood touching the concrete floor) has to be pressure-treated lumber; the rest should be 'regular.' 
    • Since (typical) studs comes in 8ft sections, this is probably the largest section of wall you will build at a time. 
    • Construct a wall section on the floor if there is room.
    • When measuring, stack the top and bottom plates where the wall will be, then measure the distance between the stack and the joist and cut the studs accordingly.
      • Do not assume the distance is uniform across a section. Joists and floors can be uneven. Measure at each joist (if you can) and cut the studs 1/4" smaller than the smallest measurement.
    • Cut the studs (and top/bottom plates when necessary) to length.
    • Build the wall section. 
      • You can use screws or nails to do this portion; we used a combination. The pneumatic nail gun was faster, but fixing mistakes was harder (and yes, we made mistakes). 
      • Most wood isn't perfectly straight; look how each stud bows and make sure any studs in a given section bow the same way.
      • Mind any pipes, access points, or other components that may adjust how you frame a given area.
      • Remember the drywall; you'll need the edges of a given piece to align with studs. This requires thinking ahead about stud placement and may require additional studs to ensure there is appropriate nailing surface. For corners, decide how the drywall be aligning and plan accordingly with stud placement.
    • For any walls running parallel with the overhead floor joists, you will need to install blocking between the joists so you have a place to secure the wood frame (and drywall).
    • Set the wall section in place.
      • You may need a hammer to get it in the final position, but beware: if a wall is too tight against the joists, it can 'push up' on them and create problems above (to include shifting drywall on upper levels).  For this reason, some recommend building the wall short (1/4", as mentioned above") and using shims as needed.
      • Fasten the bottom plate with a "powder-actuated tool" (we used a single-shot nailer). 
      • Ensure the wall is plumb (level) and fasten the top plate to the joists or blocking with screws or nails.
      • If you discover mistakes or need to add studs after the wall is in place, or need to build the wall upright because you don't have the floor space, you can 'toenail' studs in place by screwing/nailing them at an angle into the top and bottom plates.
    • Build rough-outs for door areas.
      • You must know your door size and type (will it be pre-hung?). We used two 30" and one double (48" total) pre-hung doors for our project.
      • I will add a resource/link
  • Build bulkheads or 'bump-outs' where needed.
    • Pipes, gaslines, and other things may be impossible or unwise to move and interfere with the wall or ceiling. In those cases, the best option is to build a bump-out around something on the wall or a bulkhead around something on the ceiling. 
      • A bump-out (and I don't know if this is the right term) can be a short wall section built to go around the obstacle in question. 
      • A bulkhead may require some creative thinking. In our case, we had to build one around the HVAC duct and gas line. The group used plywood, 2x2s, and 2x4s to frame out the area. [show picture] The key concept when building this is to make sure you have enough wood to overlay/adequately support drywall.
  • Install electrical.
    • As we worked on the framing, experienced friends did the electrical. Thankfully, most of the wiring runs were already in place from when the basement was previously finished, so this portion leveraged the existing and ran new branches from that.
    • Obviously, electrical should be done after framing and before insulation/drywall, so everything is exposed.
    • Don't mess with electrical unless you know what you are doing. Being familiar not just with the wiring technique but also electrical codes is a must.
    • Outlet boxes get nailed into the studs and should be mounted so their face is 1/2 inch in front of the stud. The 'new construction' boxes are designed to be mounted thus, as it means it will be flush with the drywall once installed. 
      • We forgot to do that in a few places, mounting the boxes flush with the stud instead. That's okay—they sell box extenders in varying depths (I've seen 1/4", 3/8", 1/2", and 3/4"), and those fix the problem. If you have to use a box extender of 3/8" or more, you might need new screws to mount your outlet into the box itself. 
    • General rules of thumb for installing outlets, switches, and lights:
      • (I will add this)
  • Install rolled insulation.
    • Once framing and electrical was done, we rolled, cut, and stapled insulation into the wall cavities.
    • Rolled insulation generally comes in 15-inch widths to fit nicely between the studs. The process is straightforward: unroll the insulation, measure the length of the wall cavity, cut the insulation to length, place it in the wall with paper side facing towards you, unwrap the paper edges to place them over the studs, and secure the paper to the studs with staples.
      • If your studs are of differing widths, you may have to buy a different product or be prepared to cut the roll lengthwise a lot.
      • For cutting, recommend using a utility knife and cutting with the fiber side of the insulation face-up. Make sure you lay the insulation on a suitable surface (like a piece of wood) so penetrating the roll will not damage your floor.
      • For easier installation around wiring, cut a slit in the insulation at the wiring height.
    • Wear gloves and an appropriate mask when working with insulation.


Saturday, August 19, 2023

Finishing a Basement, Part 3

Continuing our series on finishing the basement . . . 
Last time, I said the stage was set, but not quite. We still had some preparation left.
  • Demolish existing structures/components as needed (1 April 2023, no foolin').
    • In our case, we removed the remaining walls and suspended tile ceiling of the formerly-finished area. We also removed the carpet on the stairs.
    • We saved the kitchenette cabinets to re-use, though we threw one away due to mold damage.
    • The walls were a combination of 'padded fabric' (think cubicle walls) and drywall. In either case, metal studs supported them, so those came out too.
    • We left metal studs around a sewage pipe on the exterior wall, as we could re-use that portion.
    • Friends helped us accomplish this portion. Their labor, knowledge (in how best to demolish and what to keep), and tools (sawzalls helped on the metal studs) were much appreciated.
      • Since the formerly-finished area had electric, we kept the outlets and wiring where possible, safely preserving them for re-use. And, of course, we had to cut power to certain breakers when doing so.
      • We also kept a few nice pieces of plywood to re-use on the bulkhead (housing the HVAC conduit).
    • It took 'only' 3-4 hours to demolish everything, since we had so many helpers. It took two pickup truck dump runs to dispose of the material. Since it was construction-related, we had to pay (by weight) for what we took there.

  • Address things running under the joists.
    • Since we were going from a suspended ceiling to a drywalled one, we had to identify and address water hoses, gas lines, and electrical wires that were running/fastened to *under* the joists (those running through the joists were fine). 
      • We had a plumber come out and re-run  faucet and refrigerator water lines through joists so this would not cause problems when building.
      • A few electrical wires were also running under the joists. We rolled those back to appropriate points (i.e. into what would be unfinished areas) to re-use portions of them.
  • Seal the walls (late April/early May 2023).
    • We painted one wall—the one with the highest probability of water problems—with two coats of drylok paint, a masonry waterproofing product.
  • Install rigid foam insulation (4 May 2023).
    • For heightened water protection and insulation, we installed 1-inch thick foamboard insulation.
      • Note: this insulation comes in 4ft x 8ft sheets. We didn't order it with the other large items, as we didn't know we would be installing it at the time. When shipping it failed, our friend came through in a pinch and got it to our home. Since his pickup truck was not a full bed, the sheets did not lay flat. Make sure you tie down such things appropriately.
    • We required 22 foam boards of this styleLoctite PL 300 Foamboard adhesive, and Tyvek Tape
    • This video is an excellent tutorial on how to install rigid foam insulation. It is pretty straightforward.


We moved the 2x4s downstairs in preparation for the work. Okay, now the stage was set.